JSP(Java Server Pages) Programs :
JavaServer Pages (JSP) is a Java standard technology that enables youto write dynamic data-driven pages for your Java web applications.
JSP is built on top of the Java Servlet specification.

1Example on JSP
step1: Create an index.html file
<html>
<body>
<h1>WELCOME TO TOMCAT INSTALLATION<h1>
<h2>WELCOME TO TOMCAT INSTALLATION<h2>
<h3>WELCOME TO TOMCAT INSTALLATION<h3>
<h4>WELCOME TO TOMCAT INSTALLATION<h4>
<h5>WELCOME TO TOMCAT INSTALLATION<h5>
</body>
</html>
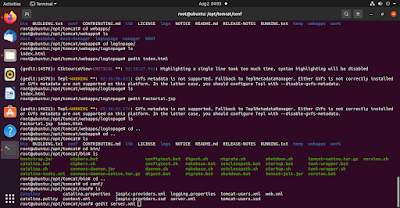
step 2:Create a directory loginpage in webapp
root@ubuntu:/opt/tomcat/webapps# mkdir loginpage
root@ubuntu:/opt/tomcat/webapps/loginpage# gedit index.html
step 3:Before going to run index.html file we need to do
the following commands
root@ubuntu:/opt/tomcat/bin# ./shutdown.sh
root@ubuntu:/opt/tomcat/bin# ./startup.sh
2Example on JSP:
Step1: Create a file named by input.html
root@ubuntu:/opt/tomcat/webapps/loginpage# gedit index.html
<body>
<form action="Factorial.jsp">
Enter a value for n: <input type="text" name="val">
<input type="submit" value="Submit">
</form>
</body>
</html>
Step 2 :Create another file named by Factorial.jsp
root@ubuntu:/opt/tomcat/webapps/loginpage# gedit Factorial.jsp
<body>
<%!
long n, result;
String str;
long fact(long n) {
if(n==0)
return 1;
else
return n*fact(n-1);
}
%>
<%
str = request.getParameter("val");
n = Long.parseLong(str);
result = fact(n);
%>
<b>Factorial value: </b> <%= result %>
</body>
</html>
output:
3.Example on JSP://indian flag display
<!doctype html><html>
<head>
<title> FLAG </title>
</head>
<body bgcolor="white">
<center>
<form>
<textarea name="myTextBox" cols="50" rows="5" style="background-color:orange">
</textarea>
<br>
<img src="flag.png" width="100px" height="80px">
</img>
<br>
<textarea name="myTextBox" cols="50" rows="5" style="background-color:green">
</textarea>
<br>
</form>
</center>
<body >
<hr color="orange" size="80">
<font face="algerian" color="blue" size="8">
<marquee scrolldelay="10" direction="left" behaviour="alternate" > Indian Flag </marquee>
</font>
<hr color="green" size="80">
</body>
</body>
</html>
output:Servlet ProgramStep 1: create a folder serapp on the desktop root@ubuntu:/home/vl/Desktop# mkdir serapp1Example on Servlet:Step 2: create 2 folders and 1 file i.e file index.html , src folder,WEB-INF folder root@ubuntu:/home/vl/Desktop# cd serapp root@ubuntu:/home/vl/Desktop/serapp#mkdir src root@ubuntu:/home/vl/Desktop/serapp#mkdir WEB-INF Step 3: create a file index.html in serapp folder root@ubuntu:/home/vl/Desktop/serapp#gedit index.html //index.html <html> <head> <title> TestServlet </title> </head> <body> <a href="/serapp/Demo"> Demo </a> </body> </html>Step 4: create a file Demo.java in src folderroot@ubuntu:/home/vl/Desktop/serapp#cd srcroot@ubuntu:/home/vl/Desktop/serapp/scr#gedit Demo.java//Demo.javaimport java.io.*;
import jakarta.servlet.*;
import jakarta.servlet.http.*;
public class Demo extends HttpServlet {
public void doGet(HttpServletRequest request,HttpServletResponse response) throws
IOException, ServletException
{
response.setContentType("text/html");
PrintWriter out = response.getWriter();
out.println("<html>");
out.println("<head>");
out.println("<title> Servlet Demo </title>");
out.println("</head>");
out.println("<body>");
out.println("<marquee>");
out.println("<hr>");
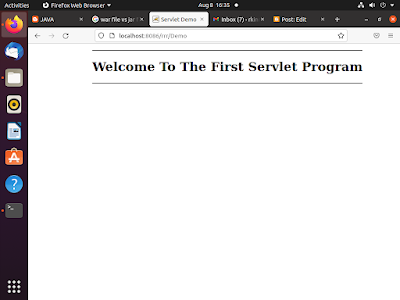
out.println("<h1>Welcome To The First Servlet Program </h1>");
out.println("<hr>");
out.println("</marquee>");
out.println("</body>");
out.println("</html>");
}
}
Step 5: create a folder classes and a file web.xmlin WEB-INF
root@ubuntu:/home/vl/Desktop/serapp/#cd WEB-INF
root@ubuntu:/home/vl/Desktop/serapp/WEB-INF#mkdir classes
root@ubuntu:/home/vl/Desktop/serapp/WEB-INF#gedit web.xml
// web.xml
<?xml version="1.0" encoding="ISO-8859-1"?>
<!DOCTYPE web-app>
<web-app>
<servlet>
<servlet-name>Demo</servlet-name>
<servlet-class>Demo</servlet-class>
</servlet>
<servlet-mapping>
<servlet-name>Demo</servlet-name>
<url-pattern>/Demo</url-pattern>
</servlet-mapping>
</web-app>Step 6: Now start tomcat Services
root@ubuntu:/opt/tomcat/bin# ./startup.sh
Step 7: Compile the Demo.java file as shownjavac Demo.javaroot@ubuntu:/home/vl/Desktop/serapp/WEB-INF#-classpath /home/vl/apache-tomcat-10.0.23/lib/servlet-api.jarlsroot@ubuntu:/home/vl/Desktop/serapp/WEB-INF#Demo.class Demo.java
//If we compile as below it will automatically generate
Demo.class in WEB-INF/classes
javac -d ../WEB-INF/root@ubuntu:/home/vl/Desktop/serapp/src#classes/ Demo.java -cp /home/vl/apache-tomcat-10.0.23/lib/servlet-api.jarStep 8: create a war file
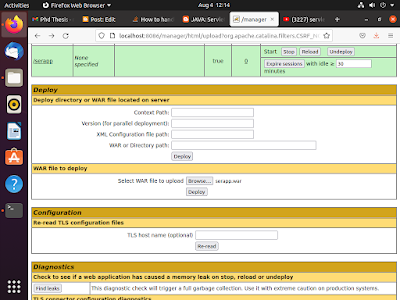
Note: JAR files allow us to package multiple files in order touse it as a library, plugin, or any kind of application. On theother hand,WAR files are used only for web applications.
jar cvf serapp.war *root@ubuntu:/home/vl/Desktop/serapp#added manifest
adding: index.html(in = 108) (out= 84)(deflated 22%)
adding: src/(in = 0) (out= 0)(stored 0%)
adding: src/Demo.class(in = 870) (out= 511)(deflated 41%)
adding: src/MyServlet.java(in = 460) (out= 246)(deflated 46%)
adding: src/HelloWorld.class(in = 877) (out= 507)(deflated 42%)
adding: src/HelloWorld.java(in = 639) (out= 257)(deflated 59%)
adding: src/Demo.java(in = 647) (out= 263)(deflated 59%)
adding: WEB-INF/(in = 0) (out= 0)(stored 0%)
adding: WEB-INF/web.xml(in = 308) (out= 154)(deflated 50%)
adding: WEB-INF/classes/(in = 0) (out= 0)(stored 0%)
adding: WEB-INF/classes/Demo.class(in = 870) (out= 511)(deflated 41%)Step 9:now by using ls -Rroot@ubuntu:/opt/tomcat/webapps/serapp# ls -R.:index.html src WEB-INF./src:Demo.class Demo.java./WEB-INF:classes web.xml./WEB-INF/classes:Demo.classOutput:


