Pages

Thursday, 4 August 2022

Servlet - JSP Programs

JSP(Java Server Pages) Programs :
JavaServer Pages (JSP) is a Java standard technology that enables you
to write dynamic data-driven pages for your Java web applications.
JSP is built on top of the Java Servlet specification.
1Example on JSP step1: Create an index.html file <html> <body> <h1>WELCOME TO TOMCAT INSTALLATION<h1> <h2>WELCOME TO TOMCAT INSTALLATION<h2> <h3>WELCOME TO TOMCAT INSTALLATION<h3> <h4>WELCOME TO TOMCAT INSTALLATION<h4> <h5>WELCOME TO TOMCAT INSTALLATION<h5> </body> </html> step 2:Create a directory loginpage in webapp root@ubuntu:/opt/tomcat/webapps# mkdir loginpage root@ubuntu:/opt/tomcat/webapps/loginpage# gedit index.html step 3:Before going to run index.html file we need to do the following commands root@ubuntu:/opt/tomcat/bin# ./shutdown.sh root@ubuntu:/opt/tomcat/bin# ./startup.sh


2Example on JSP:
 

Step1: Create a file named by input.html

root@ubuntu:/opt/tomcat/webapps/loginpage# gedit index.html

<html>
<body>
<form action="Factorial.jsp">
Enter a value for n: <input type="text" name="val">
<input type="submit" value="Submit">
</form>
</body>
</html>

Step 2 :Create another file named by Factorial.jsp

root@ubuntu:/opt/tomcat/webapps/loginpage# gedit Factorial.jsp

<html>
<body>
<%!
long n, result;
String str;

long fact(long n) {
if(n==0)
return 1;
else
return n*fact(n-1);
}
%>
<%
str = request.getParameter("val");
n = Long.parseLong(str);
result = fact(n);
%>
<b>Factorial value: </b> <%= result %>
</body>
</html>
output:


3.Example on JSP:
//indian flag display 
<!doctype html>
<html>
<head>
<title> FLAG </title>
</head>
<body bgcolor="white">
<center>
<form>
<textarea name="myTextBox" cols="50" rows="5"   style="background-color:orange">
</textarea>
<br>
<img src="flag.png" width="100px" height="80px">
</img>
<br>
<textarea name="myTextBox" cols="50" rows="5" style="background-color:green">
</textarea>
<br>
</form>
</center>
 <body >
<hr color="orange" size="80"> 
<font face="algerian" color="blue" size="8">
<marquee scrolldelay="10" direction="left" behaviour="alternate" > Indian Flag </marquee> 
</font> 
<hr color="green" size="80"> 
</body>
</body>
</html>
 output:
 
 
Servlet Program
1Example on Servlet: 
Step 1: create a folder serapp on the desktop root@ubuntu:/home/vl/Desktop# mkdir serapp
Step 2: create 2 folders and 1 file i.e file index.html , src folder,WEB-INF folder root@ubuntu:/home/vl/Desktop# cd serapp root@ubuntu:/home/vl/Desktop/serapp#mkdir src root@ubuntu:/home/vl/Desktop/serapp#mkdir WEB-INF Step 3: create a file index.html in serapp folder root@ubuntu:/home/vl/Desktop/serapp#gedit index.html //index.html <html> <head> <title> TestServlet </title> </head> <body> <a href="/serapp/Demo"> Demo </a> </body> </html>
Step 4: create a file Demo.java in src folder
root@ubuntu:/home/vl/Desktop/serapp#cd src 
root@ubuntu:/home/vl/Desktop/serapp/scr#gedit Demo.java 
//Demo.java 

import java.io.*;
import jakarta.servlet.*;
import jakarta.servlet.http.*;

public class Demo extends HttpServlet {

public void doGet(HttpServletRequest request, 

HttpServletResponse response) throws 

IOException, ServletException
{
response.setContentType("text/html");
PrintWriter out = response.getWriter();
out.println("<html>");
out.println("<head>");
out.println("<title> Servlet Demo </title>");
out.println("</head>");
out.println("<body>");
out.println("<marquee>");
out.println("<hr>");
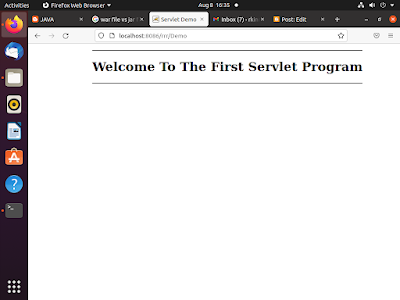
out.println("<h1>Welcome To The First Servlet Program </h1>");
out.println("<hr>");
out.println("</marquee>");
out.println("</body>");
out.println("</html>");
}
}


Step 5: create a folder classes and a file web.xml in WEB-INF 

root@ubuntu:/home/vl/Desktop/serapp/#cd WEB-INF  

root@ubuntu:/home/vl/Desktop/serapp/WEB-INF#mkdir classes 

root@ubuntu:/home/vl/Desktop/serapp/WEB-INF#gedit web.xml 


// web.xml

<?xml version="1.0" encoding="ISO-8859-1"?>

<!DOCTYPE web-app>

<web-app>
<servlet>
<servlet-name>Demo</servlet-name>
<servlet-class>Demo</servlet-class>
</servlet>
<servlet-mapping>
<servlet-name>Demo</servlet-name>
<url-pattern>/Demo</url-pattern>
</servlet-mapping>
</web-app>

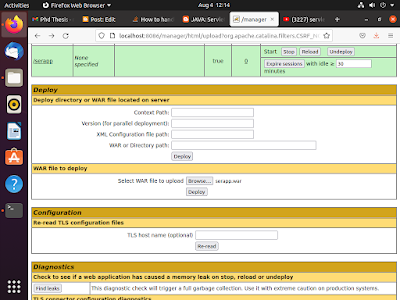
Step 6: Now start tomcat Services

root@ubuntu:/opt/tomcat/bin# ./startup.sh

Step 7: Compile the Demo.java file as shown  
 
root@ubuntu:/home/vl/Desktop/serapp/WEB-INF#javac Demo.java 
-classpath /home/vl/apache-tomcat-10.0.23/lib/servlet-api.jar  
 
root@ubuntu:/home/vl/Desktop/serapp/WEB-INF# ls

Demo.class Demo.java  

//If we compile as below it will automatically generate

Demo.class in WEB-INF/classes  

root@ubuntu:/home/vl/Desktop/serapp/src#javac -d ../WEB-INF/

classes/ Demo.java -cp /home/vl/apache-tomcat-10.0.23/lib/servlet-api.jar  

Step 8: create a war file  

Note: JAR files allow us to package multiple files in order to 
use it as a library, plugin, or any kind of application. On the 
other hand,WAR files are used only for web applications. 

root@ubuntu:/home/vl/Desktop/serapp#jar cvf serapp.war *

added manifest
adding: index.html(in = 108) (out= 84)(deflated 22%)
adding: src/(in = 0) (out= 0)(stored 0%)
adding: src/Demo.class(in = 870) (out= 511)(deflated 41%)
adding: src/MyServlet.java(in = 460) (out= 246)(deflated 46%)
adding: src/HelloWorld.class(in = 877) (out= 507)(deflated 42%)
adding: src/HelloWorld.java(in = 639) (out= 257)(deflated 59%)
adding: src/Demo.java(in = 647) (out= 263)(deflated 59%)
adding: WEB-INF/(in = 0) (out= 0)(stored 0%)
adding: WEB-INF/web.xml(in = 308) (out= 154)(deflated 50%)
adding: WEB-INF/classes/(in = 0) (out= 0)(stored 0%)
adding: WEB-INF/classes/Demo.class(in = 870) (out= 511)(deflated 41%)
Step 9:now by using ls -R
root@ubuntu:/opt/tomcat/webapps/serapp# ls -R
.:
index.html src WEB-INF
./src:
Demo.class Demo.java
./WEB-INF:
classes web.xml
./WEB-INF/classes:
Demo.class

Output:


Tuesday, 2 August 2022

Installation of Tomcat 10 on Ubuntu

1. Install Java

Upgrade the system

$ sudo apt upgrade

Update system packages.

$ sudo apt update

Install Java runtime environment.

$ sudo apt install default-jdk -y

Verify Java installation.

$ java -version

How to find the OpenJDK directory with the following command:

$ readlink -f /usr/bin/javac

As you can have multiple versions of Java installed on your system, you can decide which one is the default one.First, run a command that shows all the installed versions on your computer:

$ sudo update-alternatives --config java

2. Install Tomcat

Download the latest version of Apache Tomcat. To find the latest Tomcat version, visit the official download page.

$ wget https://dlcdn.apache.org/tomcat/tomcat-10/v10.0.23/bin/apache-tomcat-10.0.23.tar.gz

Extract the downloaded archive.

$ sudo tar xzvf apache-tomcat-10.0.23.tar.gz

Create an installation directory /opt/tomcat/.

$ sudo mkdir /opt/tomcat/

Move the extracted files to the installation directory.

$ sudo mv apache-tomcat-10.0.23/* /opt/tomcat/

Since you have already created a user, you can now grant tomcat ownership over the extracted installation by running:

  1. sudo chown -R tomcat:tomcat /opt/tomcat/
  2. sudo chmod -R u+x /opt/tomcat/bin
Edit conf/tomcat-users.xml file to configure an administrator and manager 
account for Apache Tomcat.
$ sudo nano /opt/tomcat/conf/tomcat-users.xml

Add the code below within the <tomcat-users> tag. Change the password for administrator and manager access by changing the value StrongPassword below with a high secure password.

<!-- user manager can access only manager section -->
<role rolename="manager-gui" />
<user username="manager" password="manager" roles="manager-gui" />

<!-- user admin can access manager and admin section both -->
<role rolename="admin-gui" />
<user username="admin" password="admin" roles="manager-gui,admin-gui" />

Enable remote access to Apache Tomcat by editing manager and host-manager configuration files. Edit manager application context.xml file:

$ sudo nano /opt/tomcat/webapps/manager/META-INF/context.xml

Comment out the IP addresses section as shown below. Then, save and close the file.

<!-- <Valve className="org.apache.catalina.valves.RemoteAddrValve"
         allow="127\.\d+\.\d+\.\d+|::1|0:0:0:0:0:0:0:1" /> -->

Edit host manager application context.xml file:

$ sudo nano /opt/tomcat/webapps/host-manager/META-INF/context.xml

Comment out the IP addresses section as shown below. Then, save and close the file.

<!--<Valve className="org.apache.catalina.valves.RemoteAddrValve"
         allow="127\.\d+\.\d+\.\d+|::1|0:0:0:0:0:0:0:1" /> -->

Create a systemd unit file for Apache Tomcat.

$ sudo nano /etc/systemd/system/tomcat.service

Add the code below to the file. Then, save and close the file.

[Unit]
Description=Tomcat
After=network.target

[Service]
Type=forking

User=root
Group=root

Environment=JAVA_HOME=/usr/lib/jvm/java-1.11.0-openjdk-amd64
Environment=JAVA_OPTS=-Djava.security.egd=file:///dev/urandom
Environment=CATALINA_BASE=/opt/tomcat
Environment=CATALINA_HOME=/opt/tomcat
Environment=CATALINA_PID=/opt/tomcat/temp/tomcat.pid
Environment=CATALINA_OPTS=-Xms512M -Xmx1024M -server -XX:+UseParallelGC

ExecStart=/opt/tomcat/bin/startup.sh
ExecStop=/opt/tomcat/bin/shutdown.sh

[Install]
WantedBy=multi-user.target

Reload the system daemon service to apply changes.

$ sudo systemctl daemon-reload

Start Apache Tomcat service.

$ sudo systemctl start tomcat

Enable the service to start up on system boot.

$ sudo systemctl enable tomcat

Check the status of the service.

$ sudo systemctl status tomcat 
Note: press ctrl +c after running the above coomand 
Note:Bydefault localhost:8080 if it does not start then we need 
to change the localhost:8081 and repeat the above 4 commands 
i.e reload start,enable,check
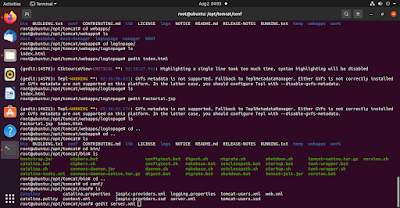
root@ubuntu:/opt/tomcat# cd conf/
root@ubuntu:/opt/tomcat/conf# ls
Catalina context.xml logging.properties tomcat-users.xsd
catalina.policy jaspic-providers.xml server.xml web.xml
catalina.properties jaspic-providers.xsd tomcat-users.xml
root@ubuntu:/opt/tomcat/conf# gedit server.xml

3. Access Apache Tomcat Web Interface

Go to your browser address bar to access the web interface and type in http://ServerIPaddress:8080 for SuiteCRM to access the web install wizard. For example:

localhost:8081/
Note:If still it is not working then we need to use the following coomands
root@ubuntu:/opt/tomcat/bin# ./shutdown.sh 
root@ubuntu:/opt/tomcat/bin# ./startup.sh


Sunday, 31 July 2022

JDBC

Introduction to JDBC (Java Database Connectivity):

JDBC or Java Database Connectivity is a Java API to connect and execute the query with the database. It is a specification from Sun microsystems that provides a standard abstraction(API or Protocol) for java applications to communicate with various databases. It provides the language with java database connectivity standards. It is used to write programs required to access databases. JDBC, along with the database driver, can access databases and spreadsheets. The enterprise data stored in a relational database(RDB) can be accessed with the help of JDBC APIs.

Definition of JDBC(Java Database Connectivity) 

JDBC is an API(Application programming interface) used in java programming to interact with databases. The classes and interfaces of JDBC allow the application to send requests made by users to the specified database.

Purpose of JDBC :

interacting with a database requires efficient database connectivity, which can be achieved by using the ODBC(Open database connectivity) driver. This driver is used with JDBC to interact or communicate with various kinds of databases such as Oracle, MS Access, Mysql, and SQL server database.

Components of JDBC 

There are generally four main components of JDBC through which it can interact with a database

JDBC API: It provides various methods and interfaces for easy communication with the database. It provides two packages as follows, which contain the java SE and Java EE platforms to exhibit WORA(write once run everywhere) capabilities.java.sql.*;

2. It also provides a standard to connect a database to a client application.

3. JDBC Driver manager: It loads a database-specific driver in an application to establish a connection with a database. It is used to make a database-specific call to the database to process the user request.

4. JDBC Test suite: It is used to test the operation(such as insertion, deletion, updation) being performed by JDBC Drivers.

5. JDBC-ODBC Bridge Drivers: It connects database drivers to the database. This bridge translates the JDBC method call to the ODBC function call. It makes use of the sun.jdbc.odbc package which includes a native library to access ODBC characteristics.

Architecture of JDBC

Description: 
1.Application: It is a java applet or a servlet that communicates with a data source.
2.The JDBC API: The JDBC API allows Java programs to execute SQL statements and retrieve results. Some of the important classes and interfaces defined in JDBC API are as follows:
3.DriverManager: It plays an important role in the JDBC architecture. It uses some database-specific drivers to effectively connect enterprise applications to databases.
4.JDBC drivers: To communicate with a data source through JDBC, you need a JDBC driver that intelligently communicates with the respective data source.

JDBC Drivers
JDBC drivers are client-side adapters (installed on the client machine, not on the server) that convert requests from Java programs to a protocol that the DBMS can understand. There are 4 types of JDBC drivers:
1.Type-1 driver or JDBC-ODBC bridge driver
2.Type-2 driver or Native-API driver
3.Type-3 driver or Network Protocol driver
4.Type-4 driver or Thin driver 
 
TYPE 1 Driver:

  • Type- 1 drivers is also known as a JDBC-ODBC bridge driver.

  • It is developed by sun microsystems and supplied as a part of JDK.

  • Internally this driver takes the help of ODBC driver to communicate with the database.

  • The Type- 1 driver converts all JDBC calls into ODBC calls and sends them to ODBC driver.

  • The ODBC driver converts all ODBC calls into database specific calls.

  • This Type- 1 driver acts as the bridge between JDBC and ODBC hence the name came into the picture.

Advantages:

  • Type- 1 driver is very easy to use and maintain.

  • Using Type- 1 driver we can access any data base.

  • It is available as part of JDK and hence, we are not required to install it separately.

Disadvantages:

  • The performance is very less. Because, first it converts JDBC calls into ODBC driver converts ODBC calls into database specific calls.

  • Type- 1 drivers may not be suitable for large scale applications.

TYPE 2 Drivers:

  • It is also known as Native-API partly java driver.

  • Type-2 driver is similar to Type-1 driver expect that ODBC driver is replaced with database vendor specific native library.

  • Native libraries are set of functions written in non java.

  • We have to install vendor provided native libraries on the client machine.

  • Type-2 drivers convert JDBC calls into vendor specific native library calls.

  • The native library calls can be understandable directly by database.

Advantages:

  • It provides better performance than Type-1 driver. Because it required only one level conversion from JDBC to native library calls.

  • No need of ODBC driver.

Disadvantages:

  • It is database dependent driver, because it internally uses database native libraries.

  • It is platform dependent driver.

  • We have to install native libraries on the client machine.

TYPE 3 DRIVERS (NET PROTOCAL DRIVER):

  • It follows 3-tier architecture where JDBC requests are passed through the network to middle tier server.

  • The middle tier server translates the request to database specific library and then sends it to the database.

  • The database server executes the request and gives back the result.

Advantages:

  • This driver is server based, so no need for vendor database library to present on the client machine.

Disadvantages:

  • Type-3 drivers require database specific coding to be done in the middle tier.

  • Maintenance of the middle tier becomes costly.

TYPE 4 DRIVERS: (THIN DRIVER)


  • It is also known as pure java driver or thin driver.

  • It uses database specific native protocol to communicate with the database.

  • It converts JDBC calls into database specific calls directly. So that client applications communicate directly with the data base server.

  • It is developed only in java and hence it is also known as pure java driver.

  • It is a platform independent driver.

  • This driver won’t require any ODBC driver or native libraries or middle ware server at client side and hence it is also called ad thin driver.

Advantages:

  • It has better performance than type-1, type-2 and type-3 driver. Because it won’t require ODBC driver or native libraries or middle ware server.

  • It is platform independent driver.

Disadvantages:

  • It is database dependent driver, because it communicates directly with the database.

  • The user needs a different driver for each database.

  • For example thin driver for oracle and connector/I of MYSQL.

  • It provides better performance than Type-1 driver. Because it required only one level conversion from JDBC to native library calls.

  • No need of ODBC driver.

Types of JDBC Architecture(2-tier and 3-tier) 
The JDBC architecture consists of two-tier and three-tier processing models to access a database. They are as described below:  
1.Two-tier model: A java application communicates directly to the data source. The JDBC driver enables the communication between the application and the data source. When a user sends a query to the data source, the answers for those queries are sent back to the user in the form of results. 
The data source can be located on a different machine on a network to which a user is connected. This is known as a client/server configuration, where the user’s machine acts as a client, and the machine has the data source running acts as the server.
 
2.Three-tier model: In this, the user’s queries are sent to middle-tier services, from which the commands are again sent to the data source. The results are sent back to the middle tier, and from there to the user. 
This type of model is found very useful by management information system directors.

How many ways are there to register a driver in Java: (Registering the Driver) :

To connect with a database using JDBC you need to select get the driver for the respective database and register the driver. You can register a database driver in two ways −
Using Class.forName() method − The forName() method of the class named Class accepts a class name as a String parameter and loads it into the memory, Soon the is loaded into the memory it gets registered automatically.
Class.forName("com.mysql.jdbc.Driver");
Example
Following the JDBC program establishes a connection with the MySQL database. Here, we are trying to register the MySQL driver using the forName() method.
import java.sql.Connection;
import java.sql.DriverManager;
import java.sql.SQLException;
public class RegisterDriverExample {
   public static void main(String args[]) throws SQLException {
      //Registering the Driver
      Class.forName("com.mysql.jdbc.Driver");
      //Getting the connection
      String mysqlUrl = "jdbc:mysql://localhost/mydatabase";
      Connection con = DriverManager.getConnection(mysqlUrl, "root", "password");
      System.out.println("Connection established: "+con);
   }
}
 

Servlet - JSP Programs

JSP(Java Server Pages) Programs : JavaServer Pages (JSP) is a Java standard technology that enables you to write dynamic data-driven pages f...